With the body back from sandblasting, I hope to make some major accomplishments this weekend. My first goal is to finish the major metal work before moving to mechanical. With so many different areas to tackle, I'm kind of starting in the middle of the car at the sills then I'll work toward the bonnet and then back to the boot.
First things first, I wanted to try and wrap up the cowl frames so I can weld the fenders back on. When I sent the car off to sandblasting, I bolted the sills to the frame so they'd stay together but they weren't quite done. The other problem I need to finish tackling is the alignment of the doors. If you recall back a few posts, I was down to blaming the door for being off but after several measurements, I'm back to assuming something with the body (or hinges). My problem (or blessing) is that the driver's side is almost perfect but the passenger side is off only at the top. It would make more sense if both were off, then I could find something in common.
 |
| Passenger side after initially mounting the door. |
 |
| Driver's door initially |
Coming to the conclusion that the doors were symmetrical and turning my focus back to the body, the A pillars are very close to each other and the only thing I could find just slightly off were the hinges.
 |
| Here are some measurements I took. The square represents the hinge door mount location. |
If all I had to go off of were the measurements, I would have thought the passenger door fit better than the driver's side because it is closer to square. Since the driver's door is closer, I adjusted the passenger side to match.
 |
| After adjustment |
 |
| After re-installation |
Adjusting the passenger side hinge probably got me close enough to be acceptable. The little bit remaining can be fixed with a little A post manipulation. Looking at the before and after shots of the driver side, I see it looks the same and is slightly off. Knowing what helped the passenger side, I think I can get the doors to line up.
While not quite ready to tie everything together, I wanted to see what it all looked like as a single unit. Not too bad.
After installing and removing the doors half a dozen times, I decided it was time to do something else. Following my plan, I turned to the biggest repair job I have left, the fenders.
 |
| Here is the passenger side fender after blasting but before prime. I didn't take a picture after priming. |
 |
| Driver side |
With there being a lot of rust along the bottoms of both fenders, I want to tackle the major spots first. Since the driver side was a smaller area, I started with it.
 |
| Still have to fix the smaller areas but the big hole is gone. |
With the driver side mostly taken care of, I moved on to the passenger side. With the amount of rust (or now lack of metal), it will take more time and care to return to presentable shape. Two things I am most concerned with, maintaining the proper curvature of the fender and the straight edge at the bottom. Fortunately, the way Jaguar made the door bead by folding the bottom edge over allowed enough metal for it to survive the rust and blasting. To hold it straight, I clamped an aluminum angle across the bottom of the door. This aligned the bottom seam and gave me a line to use for the replacement metal.
 |
| Right side shows the aluminum angle and the door bead at the far right. |
 |
| Another view at the front where enough metal exists to hold the L bracket in line with the door |
With this concern handled for the moment, the next step was mimicking the curvature of the fender. For the driver side, the hole was small enough, I could bend a piece of metal and use each side as a guide for getting the correct shape. This side has soooo much metal gone, its much harder. Another issue is I don't want to use body filler so I'd prefer to patch the whole section in one shot.
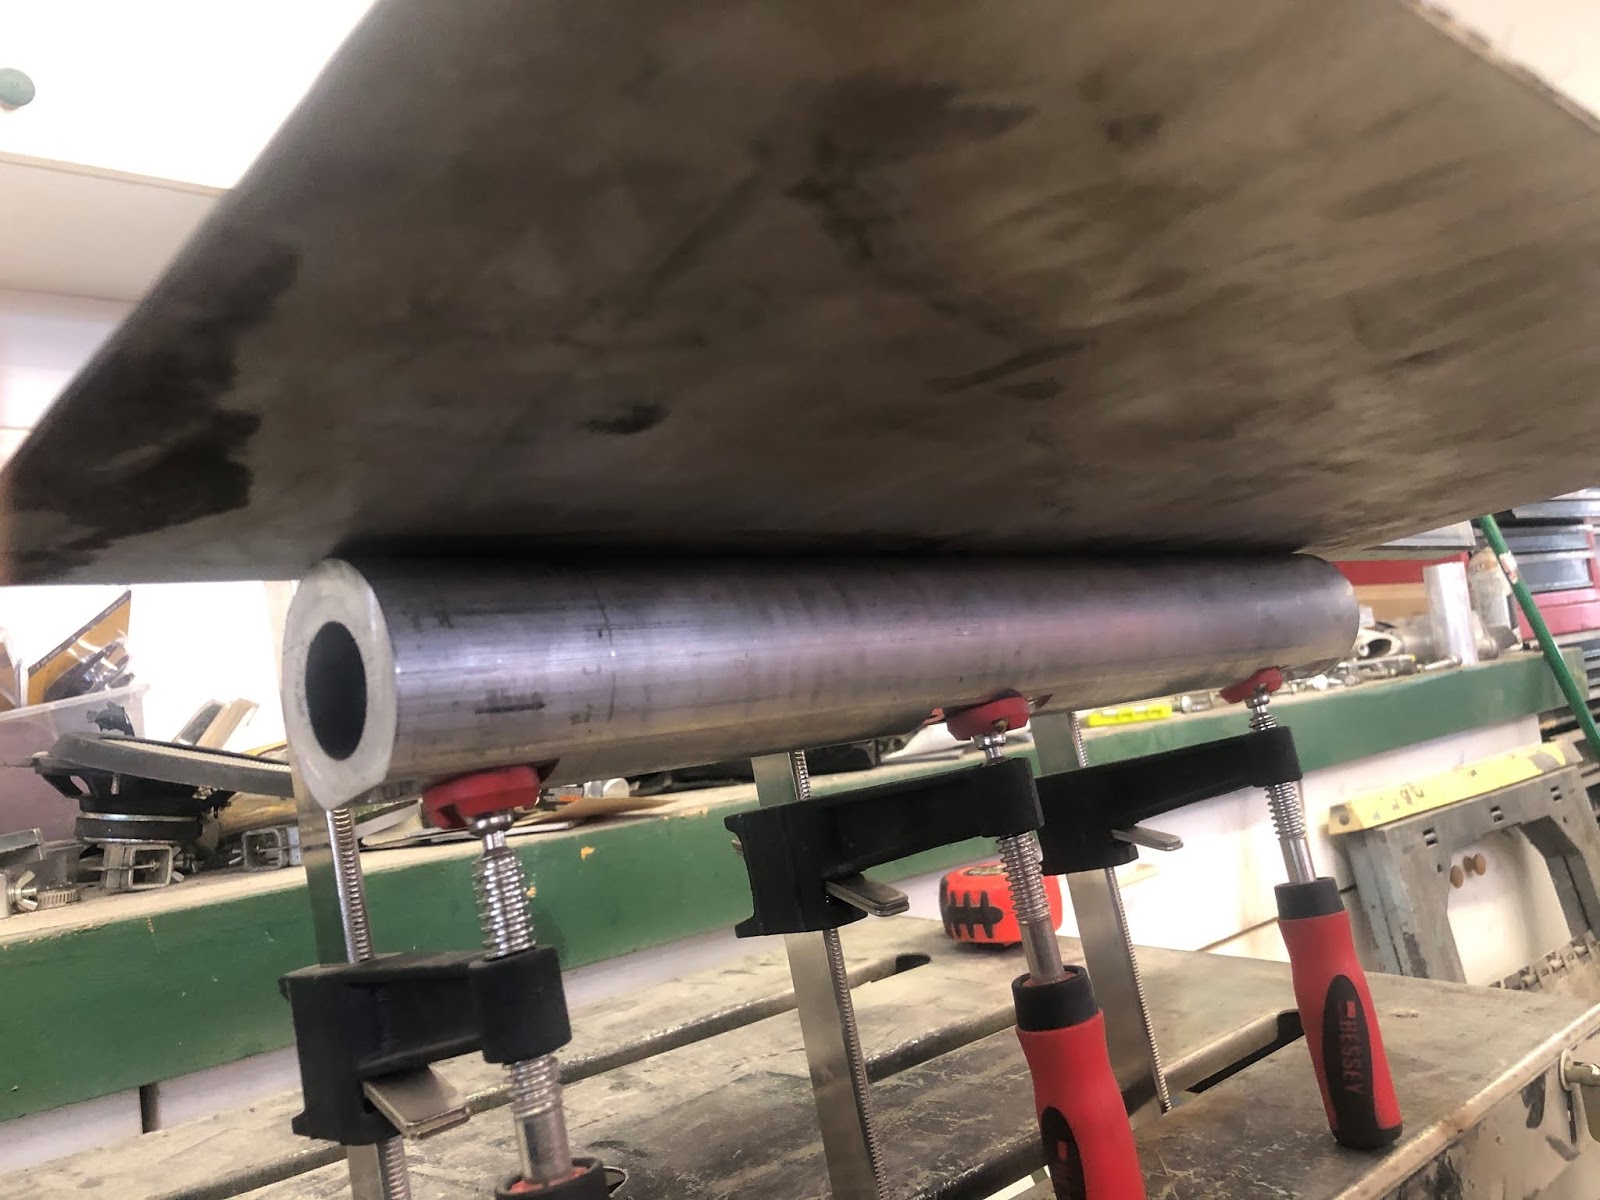
The gap I need to fill is almost 2ft long. Scrounging around my garage, I found an 18" piece of aluminum tube that is very close to the same radius as the fender (1.125" if you are curious).
 |
| While not perfect, it gives me a good start |
Using this as my guide, I clamped a piece of sheet metal between the pipe and some square tube. This allowed me to wrap the metal around the tube giving me a 2 ft wide piece with a consistent bend in it.
 |
| Here is the flat sheet ready for bending |
 |
| Sheet metal wrapped around the aluminum tube |
While not perfectly shaped, it is close enough to allow me to work the metal to get it as close as I can.
 |
| After working with the metal, I got it really close and since I'll probably be redoing the entire bottom, close enough. |
With the shape formed, I next plotted my plan of attack. With the size of the hole, it would take a big sheet and more fab work than I want to do to replace it all at once. I decided to tackle the bottom side first and then fill in the upper damage separately
 |
| If you look closely, you can see the black mark across the fender showing my cut line (black marks on a black fender, really Mike??). I tried to make it a straight cut high enough to clear the vent box cut out. |
.After a little custom fitting, the patch panel is ready to go in. Next week, I'll finish welding and grinding before moving on the other holes (and back to the doors).
 |
| Not quite a finished repair job but much better than before |
 |
| The bottom edge. The bead had enough metal left to make pretty decent welds. Before doing more than just small tacks, I laid a straight edge across the bottom to ensure it was still straight. |
After spending time grinding on one fender, I wasn't in the mood to work on the other. I was also out of grinding discs and I suspect due to COVID, so was the hardware store. Amazon (and next weekend) here I come.
One last project was making new body mounts. I'll have to trim a couple to fit but these are duplicates of the factory spacers. I also found on McMaster some .12" thick hard rubber gaskets I'm going to use in place of the red resin spacers the factory used. They are almost the same thickness and they vary slightly so different selections should yield the spacing I need.
 |
| New body spacers. You can see the one old one in the middle. |
Next week, more work on the fenders, hopefully finalizing aligning the doors (and frames) and then stitching it all together (finger's crossed). If I don't get that far, the weekend after that is a four day weekend, I KNOW I can get that far them.