Thursday, April 30, 2020

Week 2

When I last posted, I was hoping to be installing some structural steel this post but FedEx let me down.  Ultimately, it didn't matter because I spent all my time preparing the cowl for the sills and still didn't quite finish.  I ended up making a LOT of progress or at least in my mind I did.  With just a little more work, I'll have the major rust removed from the cowl and ready for media blasting.

My purpose for writing this blog was to show the progress of the car but also to hopefully provide some guidance and information for others to follow.  I also don't want to ramble on endlessly without saying anything useful.  I will try to provide some insight as to what I've learned and include a lot of pictures.

As I mentioned in my introduction, I have a bit of an affinity for Jaguars.  After this week, I still like my Jags but I am falling in love with XKs specifically.  I don't know if its Jaguar or 50's engineering but rebuilding the cowl support came together much faster and easier than I expected.  I am also fortunate that there was enough metal left (even if it was full of holes) to fabricate new pieces.

The first thing I needed to do is rebuild the dash supports but I couldn't find any detailed spec's online so how do I know what the correct dimension are?

I know from what pieces I have left and pictures online that the top angles toward the front of the car so I thought if I leveled the bottom and know the angle at the top, I could determine the specs.
What I discovered is that it was much simpler than that.  The spacing between the 1st and 2nd supports is 5.75".  This was easily determined by measuring the spacing between the dash metal extensions.  By using the angle I measured, I found that making the 2nd support 1" shorter than the 1st made the angle perfect.  The top support is notched just beyond the 1 upright and bent over so it is pressed against #2.  #3 is 1" short than 2 and is fastened to the top support at a 90 degree angle.
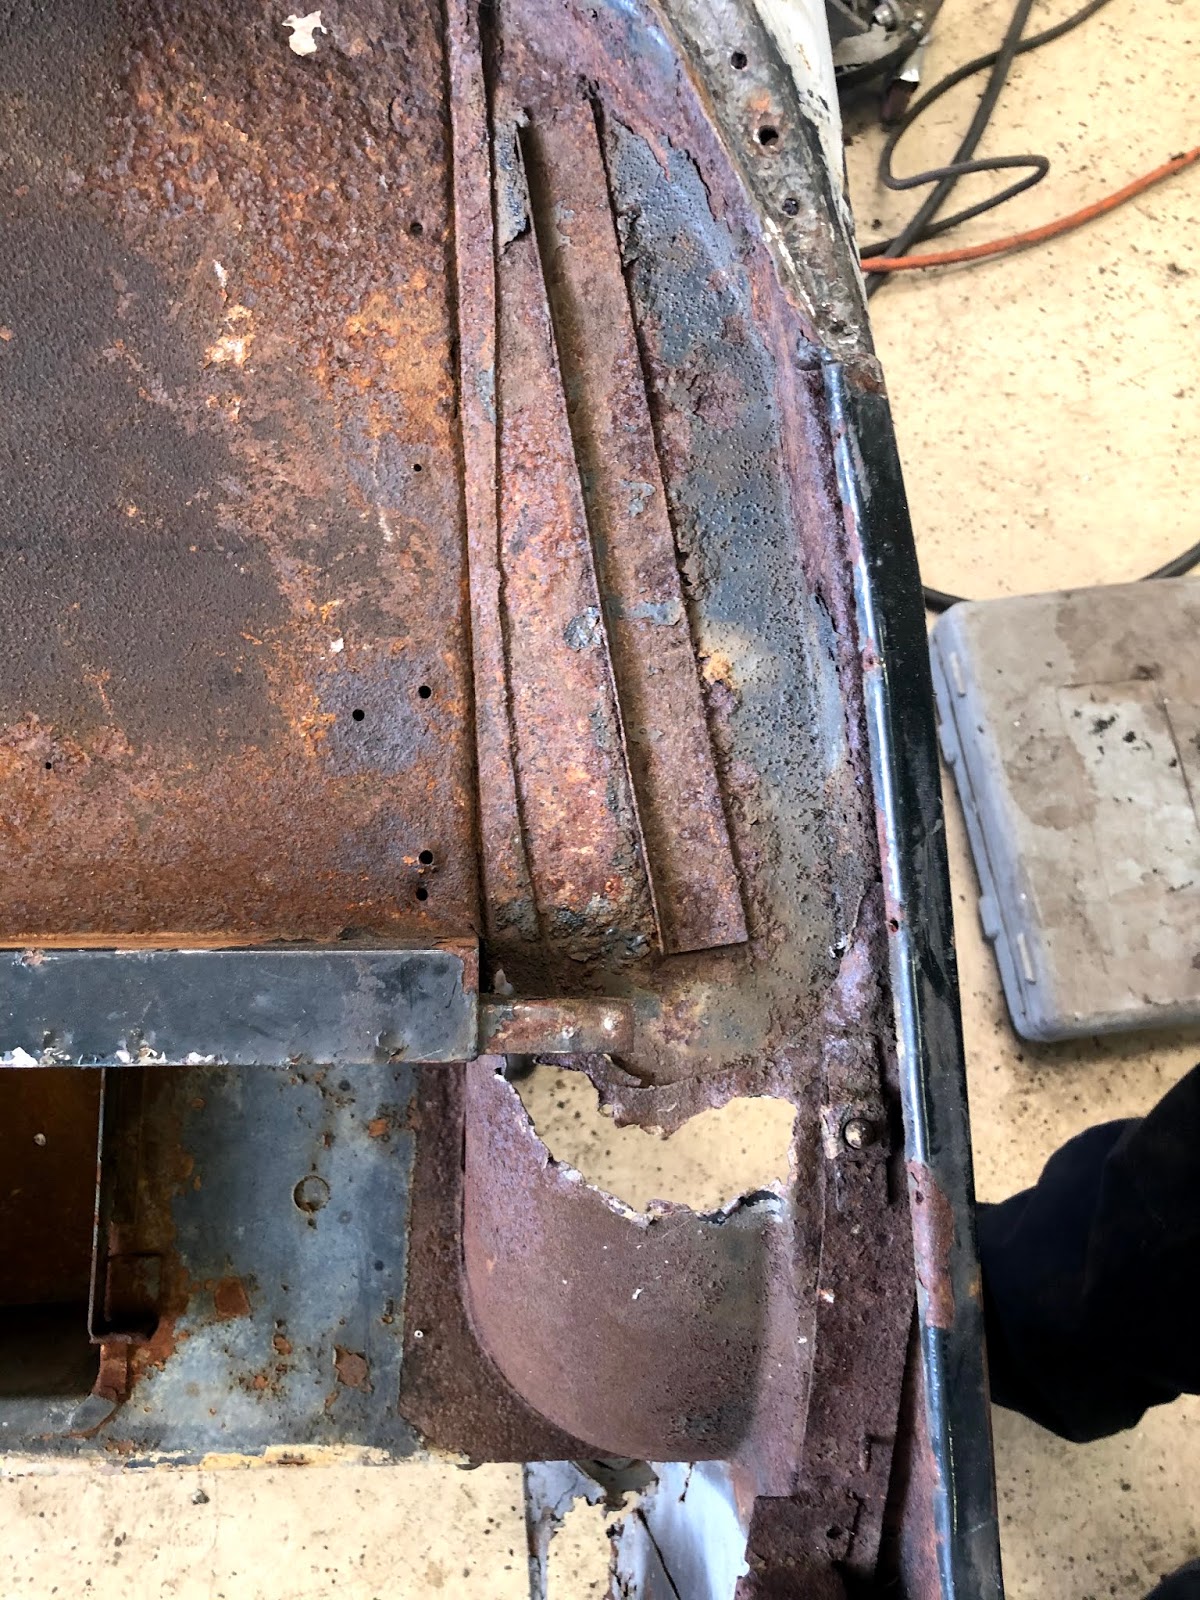
With the supports fabricated, now its time to tackle the rust.  My goal is to try and hold to factory design as much as possible so I focused on one side at a time and used the other as a reference.  Here is the driver's side with all the rusted parts cut out.
This is a view from underneath the fender looking at the firewall.  First piece I added was the dash extension metal  This extends to the dash support structure and gets welded to it to help distribute the load.
Next is the folded over section that extends down to attach to the frame and sills
I didn't get this picture at the correct angle to see that the dash sheet metal folds almost perfectly against the support.  Passenger side wasn't aligned quite as nice but I think that its because the front is tweaked slightly because of handling the body without it having support.  I'll know more when I try to align the body with the sills.

Final shot of driver's side with inner fender mount welded in.  I still have some grinding to do but should look like 1 piece of metal when I'm done.  This picture shows how the added metal fits around the dash support.  I'm very pleased with how it turned out.
Last piece is the side skirt, which seems to just tidy up the sides and doesn't add any support.  It connects the inner fender to the dash upright but doesn't attach to the dash panel.
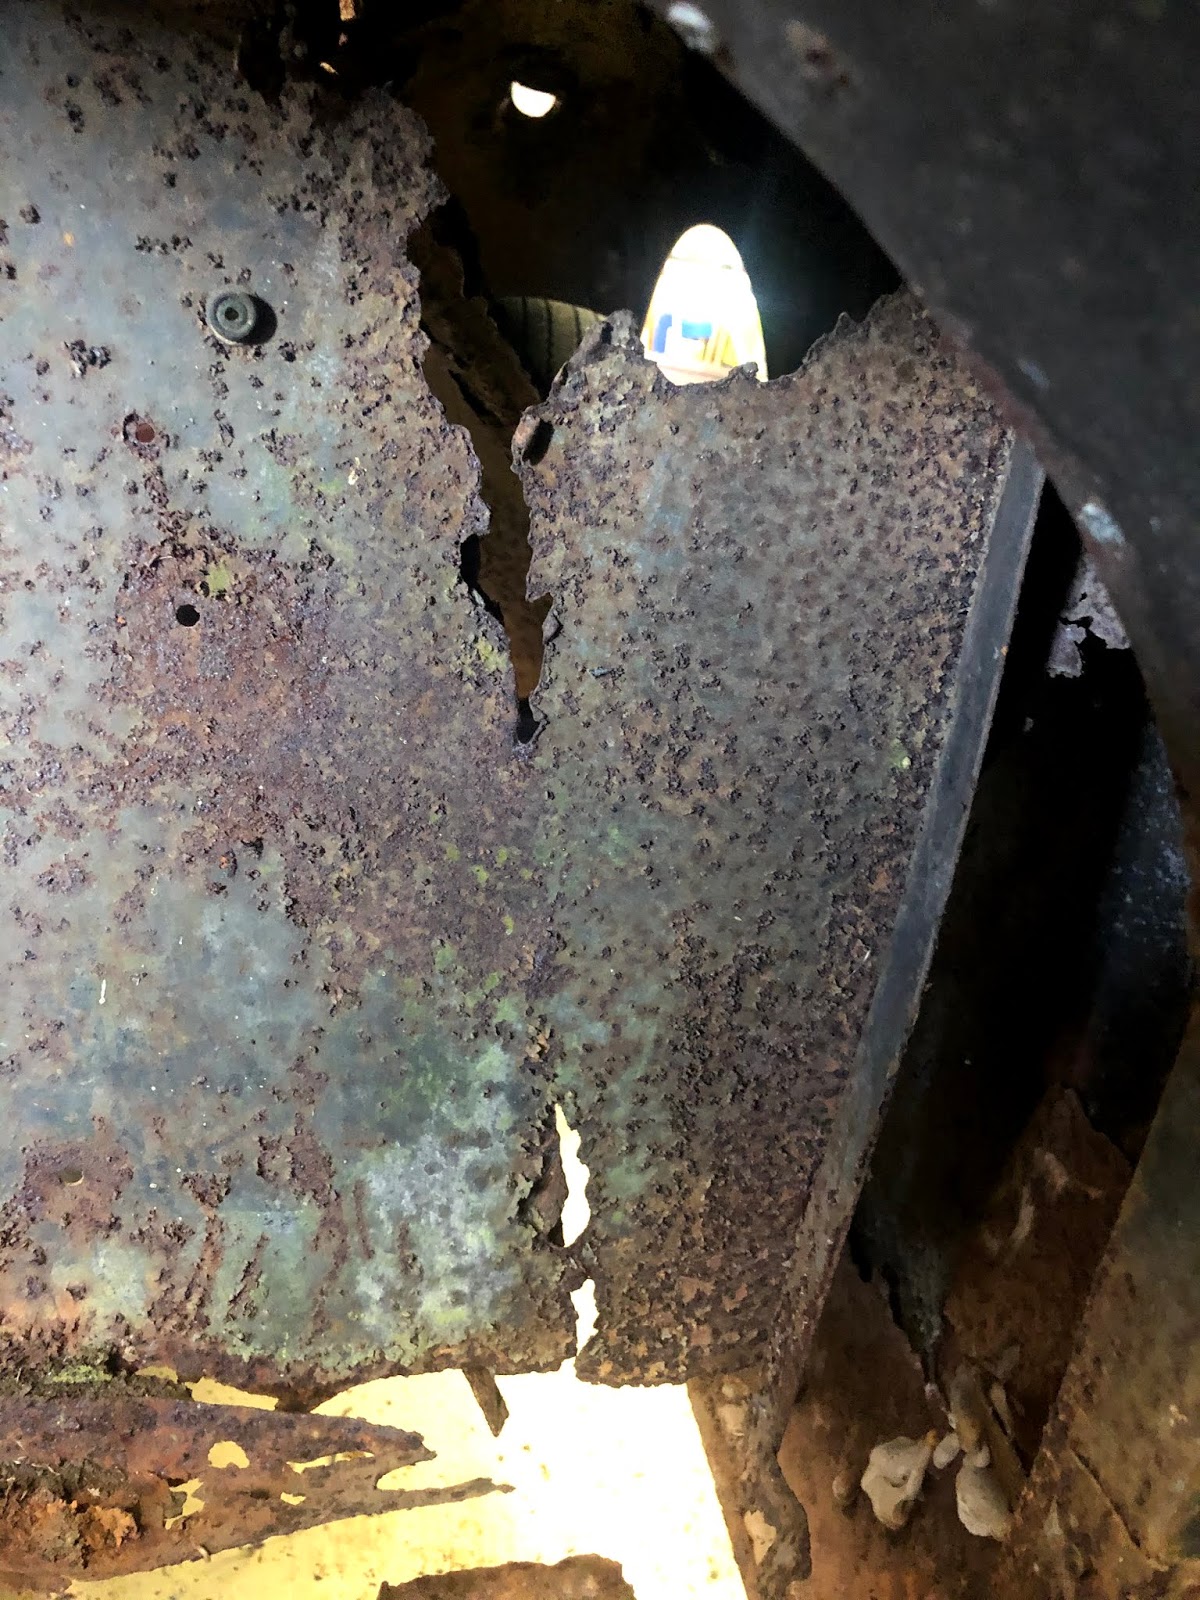
With the driver's side done, I tackled the passenger side, too.  Same drill, first remove the rust. 
Using the driver's side (now that its repaired) as a model, fabricate the replacement piece.  There was a little more rust so I had to make a larger piece but its only 1 piece.  Its secured in place with panel tie clamps.  These keep the two panels aligned and helps with spacing needed for seam welding.
To make sure the added metal is straight with the existing metal, I clamp metal flat bar against the faces before welding.
Ran out of time to finish it but did get it stitch welded in.  I added a tack weld in between each of the panel tie clamps and then after removing them, add a tack every couple of inches.  This secures the alignment and gives me a pattern to follow when finishing up the welds.  To prevent panel warping, I skip 3-4 sections at a time and go back and forth allowing the welds to cool between passes.
Last thing I did was make the dash support cross bracing
If I only had a bead roller this would be easy but since I don't a few clamps and a piece of pipe make an acceptable substitute.  I wouldn't do this if I had to make 20 of them but 2 I can do.
First thing I did was bend the lip on each side.  This kept the clamp from slipping off the sides.
The bead down the middle is 3/8" diameter so I placed a piece of 3/8" pipe under the middle.  I drew a line down the center of the metal for proper alighment
I used a 3/8" think flat bar and hammered down each side until there was a crease down the middle.  Then, I flip the piece over in a vise with the gap in the vise just slightly wider than the pipe.  I use a hammer to drive the pipe further into the metal, stretching it until I have the shape I want.
Once I was satisfied with the depth of the bead, I use an anvil and the 3/8" flat bar to hammer each side flat.  Final result is very close to the original.  Since this will be hidden behind the fender all it needs to do is add reinforcement.  No one will see it when I'm done.
Well, not completely done with the dash supports but I accomplished a lot.  Sill and door shuts are supposed to be here this week so next week, cowl back on the frame and the tough work begins.  The previous owner (PO) took measurements and notes about spacers and distances to put it back together.  

Guess we'll see. 

Tuesday, April 21, 2020

Week 1 - So Much Rust

I know, I know, should I have expected anything different in the back verses the front?
For those not familiar with XK120s, there is supposed to be a bottom shelf for spare tire storage.  Its gone, well, it was almost gone.  This picture is after I removed the remnants.

From what I can tell, at least 2" (50mm) are missing from the bottom

I'm beginning to feel about body filler like Indiana Jones felt about snakes.  Body filler, why does it have to be body filler?  At least most of the metal is there.

Here is the door shut area or at least what's left of it.  This may be the worst area of the car.  Fortunately, I have an OTS rear end to use as a model.

And the other door shut 

And from the top looking down.  Left side right behind the door shut pillar.
I didn't take pictures of the wheel wells but will when I start doing the repair. 

Similar to the front, so much of the structural support is rusted, I don't want to do much until I can stabilize the body.  FedEx says the parts are on their way so soon.

In the meantime, I did some rust repair on the spare tire support rim so after putting the body back on the frame, I can weld in the spare tire shelf.  Which came with the car but not installed.
Before

After
I cut out the rust on each side and replaced with fresh metal.  I kept all the pieces I removed so I can ensure holes are drilled in the correct location.  Next, I test fit the spare tire shelf and discovered it was incomplete.  It doesn't have either of the support pieces underneath.  Good news is I have drawings with dimensions.  Apparently, the previous owner provided sheet metal for MGs and Jaguars and I ended up with a lot of his engineering sketches.  It would have been even better if they were labeled so I knew where they went.  Maybe as I progress, I figure out where they go.

This is one of the best labeled sketches

The measurements seem to be accurate.  Here is my test piece

Nothing welded in but everything seems to line up.  I don't want to weld anything in until its back on the frame.  Now the amount of missing material can be seen on the left side.


Since I'm avoiding any structural repair, I still want to make progress.  This is the inner fender.  Left, rusted, right repaired.  It will look much better when everything is blasted and clean.
Hopefully, next update will include new structural sheet metal and something that resembles an automobile instead of a bunch of car parts.

Friday, April 17, 2020

Day 1 - Where Do I Start?

My original plan was to strip down the body of all unnecessary pieces (brackets, bolts, wires, etc) and send it off for sand blasting.  After getting a closer look, I'm afraid sand blasting may disintegrate some metal I need to use as reference for new metal.  Now, before it goes to blasting, I'm going to shore up some of the more rotted structural areas.  This way when I do take it, I won't lose anything I can't reproduce.  Pictures, pictures, pictures.  The PO also made lots of very detailed sketches with dimensions of several sections of the car as he disassembled it.  This will be helpful.

After removing anything that wasn't part of the body, I want to assess the true extent of rust.  To do this, I need to take a look at the cowl support structure behind the door hinges and fender.  After doing some research, I decided to remove the fender.
To make it easier to blend the welds back into the panel, I want to cut on the curve instead of the flat surface.
I want to remove the back edge of the fender from the door frame by removing the spot welds.  I hit the edge with a sander to make the spot weld locations a little more visible.
Next, I used a spot weld hole saw to drill out each spot weld.  This was my first attempt and I found that pilot holes help keep the hole saw centered and it works much better.
Here are the 2 fenders freed from the car.  See that spot in the upper middle?  That is remnants of a cheap rust repair.  Body filler needs something to stick to, apparently scrap metal works great.  This is the good panel, the other has about a 12" strip that will have to be replaced with real metal, no body filler going back in.
 
With the fenders out of the way, Now I can see just how bad the rust is.  Its pretty bad.

Good news, the cowl structure is mostly just bent sheet metal so something I can fabricate myself
Now having a true measure of the damage, I don't want to do anything with this until the new sills arrive.  This interface point is crucial to a properly aligned car.  I think between the sketches and what little metal I have left, I can get everything straight.  All that is left to do is get the body off the frame so its easier to work with.
Thanks to Jag-Loves, I found some plans for making a roll around frame.  I took a few liberties but the height measurements were very helpful.  I welded this together upside down so I could use the car frame mounts to ensure they line up with the body.
With this done, the front half is on hold until parts come in.  Next time, I'll start on the rear.


First Impresions

They say a picture is worth a thousand words.  How many 4 letter words do these pictures say?


And those pictures are just from the front half.

I guess the silver lining is the fact that most of the rust is on interior flat panels, not too much metal shaping (hopefully). A quick google search and several suppliers of the critical pieces (sill and door shuts) can be found.  No reason for me to stress about the dimensions and structure of them.

Monday, April 13, 2020

In the Beginning

Even though Jaguars are solitary animals and don't run in a pack or herd or pride, I've added another one to my pride.  I currently own 2 XJS's, 4 XK8's, 1 XKE and now an XK120.  Stupid auction sites, this time it was Bring A Trailer instead of eBay but the result is the same, I now have another project.  Well, my Caddy project gets put away for now and the corvette will slow down a little because I'd much rather work on a Jaguar.

I have to say, at least I went into this one with eyes wide open.  Bob did a great job of showing what was included and the shape of the car.  Not sure how long the link works but here it is: https://bringatrailer.com/listing/1953-jaguar-xk120-drop-head-coupe-5/

When you buy 1 car that is in 3 pieces, I think you might be certifiable.  Well, call me crazy because it is mine.  For the most part, a numbers matching car.  The engine block is not original but the rest is.  Not that this is overly important to me.  if you read the introduction, you know that I want to enjoy my car, not make it a trailer queen.  I doubt I will ever want to sell it so it doesn't matter for resell value either.  I am much more concerned with having to track down all the little pieces to complete the puzzle.  With the 190 pictures, from what I can tell, most of those are there.


While I love my E-type, I sometime wish it was a convertible.  Living in Northern Nevada, there are MANY days each year when its nice to drop the top and go for a cruise.  With the price of OTS XKE's, I just can't bring myself to buy one, nor do I like the lines as much as the FHC (or 2+2).  Also being a unibody car, I'm not as excited about buying one that is rusted out.  So, along comes this DHC XK120.  Having amassed a lot of metal working tools, bolstered my welding and fabrication skills, I think I'm up to the challenge.

I guess we'll see.

Before I begin


Before you embark on this XK120 journey with me, there are a few things you should know.  I am NOT a professional restorer or Jaguar expert.  What I am is a person with a lot of initiative, drive and ingenuity.  I have had a love for automobiles since I was a teenager and have slowly gained knowledge and experience over the years.  The internet has definitely increased the learning curve as now if I have a question, just search for it and tada!!, there it is.

I need to pause here and say that I try to do as much as possible myself.  Partly because I try to be frugal and partly because I've been disappointed many times by the 'professionals'.  My methods might be unorthodox and probably not the best, most efficient way but it is A way.  One thing I really like about working on a car is that until it has paint on it, a welder and grinder can make all things right.

All of that being said, I was inspired by Bob Exelby and his blog for a XK120 restoration and thought I'd do the same.  My goal with this blog is to allow others to share my journey through this project and hopefully, like I did with Bob's, learn something useful.  My goal at the end of this is to have a car that is solid, mostly original (upgrades to make it safer and more comfortable to drive but nothing that can't be reversed.  This will NOT be a concours restoration because I want to drive my car not make it a trailer queen.  Even if its not a concours car, that doesn't mean it can't be done the right way.

One last thing, thanks again to Bob Exelby for his blog, he provided a lot of insight and direction for me.  Also to the jag-lovers forum and all its contributors https://www.jag-lovers.com/models/xk/xk120140150-2/.  Oodles of great information on these sites.


Previous (or current) projects:


1965 T-Bird
First full restoration, turned out OK.  Sold for more than I had in it
1941 Cadillac Sedanette - Work in Progress
1941 Caddy as it sits today.  Cut my teeth on metal fabrication.  Full floor replacement, Chopped the top, shaved the doors...
1969 E-Type.  Tub and 12 boxes of parts
9 months later, Won Peoples choice award at its 1st car show